Hello, Beautiful Blogosphere!
What a busy weekend I have had getting ready for Baby Muller! Fortunately, with a checklist in hand, I have managed to make some head-way on my baby-to-do list. The nursery is close to complete, and I cannot wait to post pictures of it for y'all to see! I will also be doing a post on all of the DIY projects I did for the baby's nursery including a baby blanket, a changing pad cover, and wall art. Today, however, I want to focus on another DIY project list I tackled yesterday: modern nursing covers. While I think the DRIA nursing cover is beautiful, it cost around $80 per cover. Being a teacher and the wife of a preacher, and loving to use my sewing machine to create new things, I knew there had to be a better way to get the same look for less money.
Thanks to the wonderful world of Pinterest, I was able to find two types of nursing covers that appealed to me and my style. One is an asymmetrical shawl, and the other is an infinity scarf style. I also created a third one that may or may not change based on an idea I had in my head, but more on that later. Here are my finished nursing covers with links to their tutorials. (Forgive me that my pics are selfies, but it is all I have time to worry about getting these days.) I purchased my fabric from fabrics.com, and they are all 100% cotton knits for breathability and ease of wear. Click on any of the titles of the nursing covers to find the tutorials on their original blogs.
Style #1: Modern Nursing Shawl as Featured on TheCoterieBlog
I initially saw this cover and tutorial on Pinterest, and I knew this would be a great option for creating a look similar to that of the DRIA Oslo cover. The author, Heather, explains that this is a terrific cover because it isn't an obvious bib-style cover, and it will offer you coverage in both the front and the back when nursing. It is also a sewing project that requires you to create just one straight line. (You can, of course, add more if you want to finish every edge, but that is optional. I left mine undone as the knit fabrics I chose won't fray.)
 |
| This is one of the images from TheCoterieBlog of the nursing shawl. |
The instructions on the site are fairly simple if you pay close attention to details and don't let the photos confuse you. To create this look, you only need ONE SEAM. There are two sides pinned in the photos on the tutorial, but one is pinned simply for stability (the folded side). The other side with the neck-opening is the ONLY side that gets sewn. Also, you need to know going in that the shawl is asymmetrical. One adjustment I ended up making: doing a 30 in x 25 in rectangle for one cover (the gray and white stripes) and a 30 in x 27 in rectangle for the other (the black cover). I found the extra two inches helped me feel more balanced out. I am 5' 5" tall, so I enjoyed the little bit of extra length. Always start longer than you may think you need. You can take off, but once cut, you can't grow fabric back. Here are my finished products:
 |
| You can see how it hangs at an angle. On one shoulder, I have the "folded edge," and on the other shoulder is the one seam that I sewed to create this cover. |
 |
| Cool bonus feature: if you spend a couple minutes scrunching, twisting, and adjusting, you can turn this cover into a cool, chic infinity scarf! I didn't do this in any particular way, just playing with it until I liked how it looked. |
 |
| Here is the same tutorial in black, and this is the one I created a 30 in x 27 in rectangle to make instead of the 30 in x 25 in. |
 | ||||||
Here is what these covers look like in the back. You can see that there will be much better coverage from that angle than you get with a bib-style cover.Style #2: Infinity Scarf Nursing Shawl as Featured on DiaryofaMadCrafter
This was a style I also wanted to try as it is now fall, and scarves, although not always needed in a New Orleans fall/winter, are an easy and useful accessory when the weather cools down. I saw this post from Diary of a Mad Crafter on Pinterest, and I knew this was a style I wanted to create. It is another easy way to make a full-coverage cover that will provide you with some modest blockage all the way around. Here is an image from her original post:
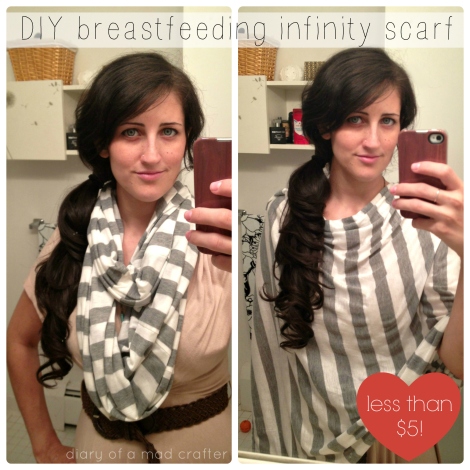
This tutorial was super easy to follow. You basically fold your yard of fabric in half, make sure it is square, and sew (again) a single, straight line. It took less than ten minutes to make, and it turned out really cute. Here is my finished product:
I did have some trouble figuring out just how to wear it in the front to make sure there wouldn't be accidental boob-exposure when nursing and how to simultaneously fully cover the back as it is just one big loop. Another Pinterest search lead me to this image and tutorial from TwoBlueSparrows that shows a cool way to wrap an infinity scarf nursing cover. I will be trying this way of wrapping next time I put this puppy on.
  |


It seems so obvious looking at it to wear it across, almost sash like, but that didn't dawn on my pregnant brain at 11:00 last night. Thank you, Two Blue Sparrows and Mad Crafter, for the amazing tutorials.
Style #3: My Make-Shift, Oversize T-Shirt Nursing Cover
 |
| Here is my oversize t-shirt just being worn. Maybe adding a belt around the waist would help with the style? |
 |
| This pic should give you an idea of what the shape of the garment is as a whole. It is literally like wearing two squares of fabric sewn down the sides. |
That's it! It is like a hugely oversize t-shirt. I folded my yard of fabric in half, cut it into an equal square (maybe 30x30ish), pinned the sides to leave to large arm holes (for wearing and baby's breathing), and sewed two straight seams down those sides. Then, I cut a boat neck style opening about 13-14 inches across in the center of the square. That is it. It is roomy, and I will be playing with the logistics to see about making it look a bit more chic. Feel free to leave comments and ideas here.
Nursing covers no longer have to make women feel like overgrown babies wearing large bibs thanks to creative women like those featured here and the many others who are making and sharing their ideas via blogs, social media, and sites like Pinterest. Each of these cost around $5 to make, so buy some knit fabrics you love and play around with them! Have fun, and make the styles work for you and your bambino-darling! Make sure you check out these awesome, creative ladies' blogs, and happy sewing my friends!
Y'all Come Back Now, Ya Hear?
Brittney


Thanks for this lovely and complete overview of all the possibilities! I was due two days ago and I can't think of a better way to spend my time than to make one of these perfect covers to keep my mind of the waiting. I think I'll go for the scarf although the fabric I got is quite thick, and wearing it in a loop around my neck may be a bit heavy? But we'll see. If anything, it'll give me an excuse to do some more fabric shopping :)
ReplyDeleteMy pleasure! I am glad you found the post useful. I hope you are enjoying your new baby, and happy sewing!
DeleteMy pleasure! I am glad you found the post useful. Enjoy your new baby, and happy sewing!
ReplyDelete